How to use Asana to become a productive designer
Think about your typical day for a moment. What does it look like? Do you start up your computer and just start with whatever you feel like doing at that time? Do you have 10 post-it’s in front of you with all the things you need to do? Or do you have a paper planner or calendar?
I am a big sucker for notebooks and planners and my husband knows it’s a lot battle of going me to walk on when I see a store that has pens, notebooks, folder etc.
So naturally, when starting my business I got myself a new notebook, loads of post its and a couple of new pencils (No pen’s for me, I always write with a pencil). I made as many notes as I could and created to-do list after to-do list.
But I soon started to figure out that with the complexity of running a new business I needed more than my post-its and paper to-do lists. As I just could not keep track of all the tasks of creating the website, social media planning, blog posts etc.
So in my search for more structure, I heard a lot about Asana. After logging in for the first time on the free subscription (and I still use the free one) I loved it. It took some time to get everything set up and I still keep adding and tweaking but I absolutely love it. And it has made such a big difference it getting all my tasks and projects that run alongside each other organised.
And it is a platform I would highly recommend for coaches for any business owner.
First, let me explain a bit more what Asana is. Asana is a project management system. On the website, they say that ‘Asana is the work management platform teams use to stay focused on the goals, projects, and daily tasks that grow businesses.
What this means it is a program that gives you an easy way of increasing productivity, getting organised and have all your tasks in one place. The system helps with this as you can organise all your projects you have in your business that are connected to your main goals. You can break each project up in smaller tasks, add workflows, assign team members that are responsible for a task, attach deadlines and track time. And I guess we can all see how this can make running your business so much easier.
Let’s start with creating a project.
How to create an Asana project
There are a couple of ways to set up your project. To add a project click the + in the menu on the left. Then you can pick if you want to start with one of the templates that Asana provides, import a spreadsheet or start with a blank project.
If you want to go for a template you can use the dropdown on the right to narrow the options based on the categories. If you don’t see anything you like you can still pick a black project in the top menu.
If you have created a project in Excel and want to upload it you can use the upload spreadsheet option.
Next, you need to choose if you want to use a project that looks like a list, a board or a calendar. If you have the paid version, you can also pick timeline. And select if you want to keep the project private or share it with the organisation you created Asana for. Or when you have the paid version you can share it with specific team members.
For most of my projects, I like to use the board option as this gives me a better overview of everything that is going on. And it is really simple to drag and drop a task from one column to the next.
Each column has a title and I only use it for tasks related to that. As you can see below (this is my planning board) the first column I have are my quarterly goals. Underneath I have all my goals listed from newsletter subscribers to website visitors and income goal. I have this as my first column on purpose as this way I see it every day and makes me very aware of what I am working towards to. For tracking my goals I use an excel spreadsheet.
Next column is Ongoing where I have a short list of things I have not planned out on a weekly or daily basis but things I need to remember like do market research or which books I am reading this month.
Then I list my big 3 for the week. These big 3 tasks are related to the big goals that I have listed in the first column. Every week before I even start on Monday I make sure it is very clear what I am working on that week. And then these big 3 get broken up in smaller tasks that are spread out through the week.
And I always like to have a wait for feedback column. Because I spend most of my time on clients work there are a lot of tasks that I can only start after I have received feedback from my clients. This sometimes makes it hard to plan out your week as you don’t know when the feedback will come. So, instead of planning a task for a specific day, I list it under wait for feedback. This way I don’t forget that I am waiting for this and helps me to send a quick check-in when I have not heard anything yet after a couple of days.
As this is my planning board I have much more columns then the once I mentioned so I won’t go into detail with all of them but I do want to list them so you can get an idea:
Big 3 of the day (planning per day of the week)
Upcoming blog posts (dates and subject of the posts + workflow of writing them)
Upcoming newsletters (dates and subject of the posts + workflow of writing them)
Next 4 weeks (Quick overview of tasks I need to do in the weeks after the one we are in)
Parking lot/brain dump (all ideas I get while working I list here so I can come back to them later)
Client projects (list of all client projects I am working on + workflow for the specific project
Monthly duty day (there are some tasks I only do once a month on the first day of the month and I list them here)
How to add tasks, workflows and more to your project boards
So what do you do after you have set up your board and created the columns?
Before creating a project it is good to have an understanding of what you are going to use it for. This will make it easier to think of the names for the columns and what your tasks should be.
As an example, let say you want to launch an online shop. Then use the columns to break up the project in smaller steps. You can think of the research phase, product ideas, product creation, shop creation, launch planning, related blog posts you are going to write, newsletter funnel, other marketing activities. Don’t worry too much about the order as you can easily drag and drop the column to create a different order.
Then while doing your research on how to set up a shop start adding tasks (use the + sign on top of the column) to all of these columns where you break the main step (the tile of the column) up into smaller tasks.
Then think if you can break a step up into even smaller tasks. So if you would think about the physical creation of the shop you can include subtasks like setting up taxes, shipping options, payment gateways, how you get notified about orders, create check out page, upload products, create product descriptions etc)
To add these sub-tasks you click on the task. Then click on the + next to subtask and start adding. If you have people working for you, you can assign the task to s specific person, you can add a due date (you need to add a due date if you want to see all your tasks in the calendar, my task view or receive notifications of tasks that are due). You can also add this task to another project (more on that a bit it further on).
You can also add a description if you want to or use this box for notes. Then if you scroll down you can also communicate with everyone assigned to this task by sending messages.
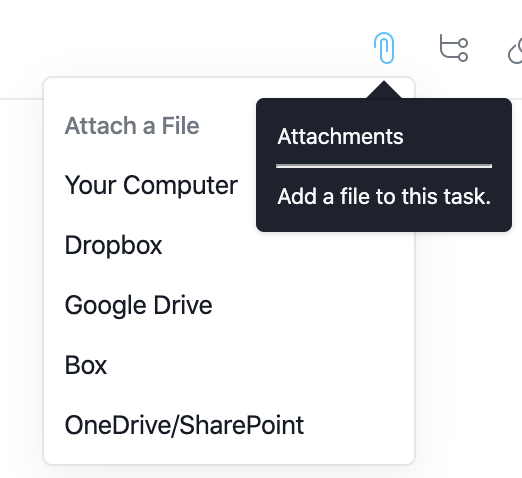
But not only that, you can attach files and images to keep everything in one place, create a link to share a task with someone who was not assigned to this project and duplicate a task. You can also track the time (if you use the Harvest integration that is part of Asana) which I highly recommend. This will make you even more productive because you exactly know where your time is going. Because if you let yourself, it is very easy for a tasks to stretch for hours because you have no clue how much time you are spending on it.
I understand this is a lot of information and might not make sense if you have not worked with Asana or any of the other project management systems before. So, let show you how I use it in my service-based business.
How I use Asana on a daily base
To give a complete overview it will probably help to know which project is have. The projects I currently have in Asana:
Planning (this one I mentioned before)
Guidebook (this is where I keep an overview of brand materials, links to all my blog posts, landing pages, social media handles, text for bio, links to tools like zoom and Acuity and all my workflows)
Goal setting
Content calendar by week
Content calendar by day
Launch planner (a template I use every time I launch something or have a promotion)
Morning wind-up
In the morning I start with a quick look at my goals. I go to my planning board to the first column and look over my goals. Then I open up the spread sheet that I use as a data tracker and update it with the latest figures. I check my Google Calendar for appointments (in this case I don’t use Asana) and go on to review my big 3 of the day (also in my planning board). I check if I am still happy with the planning I made the day before as I always finish my day with updating my planning based on what I got done. If not, then I drag and drop the tasks and change the order based on the order I will do them that day. Next I go to my content planning by day board and check which post was supposed be published today. Then I go in to Planoly and check if this is actually what is planned and if all settings are correct.
This is my quick morning check in to set me up for the day. Do you see how I use Asana and my planning board to guide me through my projects and quickly get the information I need to know?
Blog post writing
Every week I have a blog post that needs to be published. As I mentioned before I have a column in my general planning board for upcoming blog posts. This gives me a quick at a glance overview of what I am going to talk about in my posts in the coming weeks.
If I go into this task you can see this I have included a due date (the date the blog is going live), that it is connected to my planning project and is in the upcoming blog post column but it is also connected to my content calendar by day board in the week 9 column.
When you would scroll further down you could see my description. In this case this has the do with how i prepare my blog posts and draft up the outline. Listed underneath this are all my subtasks. This is basically my workflow for writing a blog post. So every time I come up with a new blog post title I duplicate another blog and have all the tasks I need to do for writing the post all right there.
Now let’s go back to that I have also linked several projects to one task. Because for a large part my planning board exists of tasks from all my projects.
Product launch
To go back to the shop example. You want to launch an online shop and have created the shop project board, created columns and included tasks for creating the shop and the products and for the launch. Now you have a great overview of everything you need to do for the launch. But you don’t have an overview of what needs to be done when and how this fits in with all your other tasks.
That is why you also add your planning project board to all tasks. Just select the column with the right week-number and this task will automatically show up in your planning board. If you make a change in your shop launch tasks, that change will also automatically go to the planning board.
But because you also have a marketing plan for the launch you will have a lot of items you need to create for your social media channels. Just add your content calendar board to all the topics you want to talk about and you now also have a complete overview of what you need to create for you social media in the coming weeks.
And this is one of the things I absolutely love about working with Asana. I only have to create this task one day and can link it to other projects. And all projects that are running alongside each other all come together in my planning.
One other tool I want to mention that I could not run my business without
In another effort to streamline my business, besides Asana I use Dubsado. While I do have all my tasks for client work in Asana there are quite a few things Dubsado can do what Asana cannot. So what do I use Dubsado for?
Create proposals
Create contracts and sub-contracts (initial logo design approvals, colour palette approvals)
Send invoice
Bookkeeping
Send out questionnaires
Send reminders if a questionnaire is not filled in, a contract is not signed or an invoice not paid
Client portal to keep all files and client communication organised for a specific client
Want to more about how I use Dubsado? Read this blog on how I use Dubsado to manage my design clients
So, there you have it. This is a quick overview of how I use Asana to keep my business running smoothly. And who would not love to be more productive, have clear overviews of your projects and get your tasks done?
I would love to know if you are using a project management system and how this has impacted your business.
If you thought this post you might also like:
LOOKING FOR ANYTHING?
popular in the shop
FOLLOW ON INSTAGRAM
favourite
resources
*Below links are affiliate links and I get a small kickback if you use these links to sign up


